I installed Red Hat with my developer subscription and chose to install Bind with the GUI installation. The instructions that follow are what needs to be done to setup Bind9 in the most simplistic of forms to allow your first Domain Controller to be installed without installing AD DNS and pointing it to Bind9 instead.
RHEL9 Box:
Hostname: bind
IP: 10.1.104.5
Domain Controller:
Hostname: TestAD01.ad.test.lab
IP: 10.1.104.100
This does not include the instructions for Setting up GSS-TSIG to allow for dynamic updates. These instructions will be in a follow up post.
Configure DNS To Automatically Start
sudo systemctl enable named --nowVerify That DNS is Started
sudo systemctl status namedConfigure DNS File
sudo vi /etc/named.conflisten-on port 53 { localnets; } #Remove 127.0.0.1
allow-query { localnets; |; #Remove localhost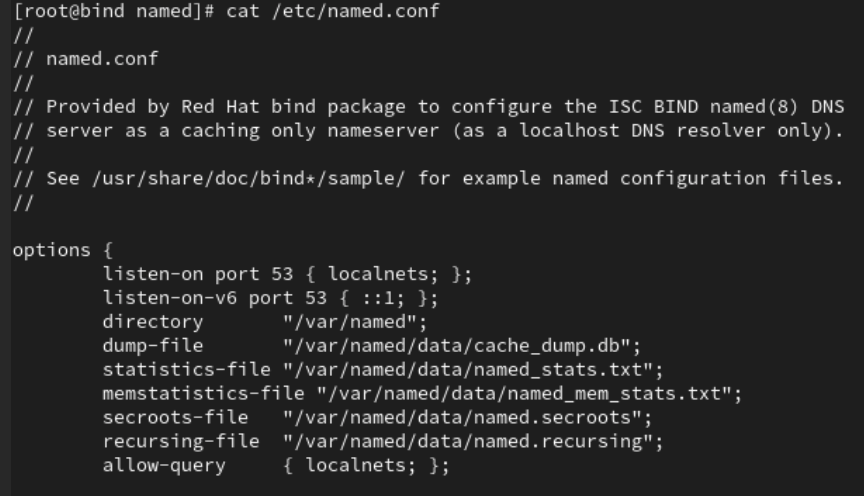
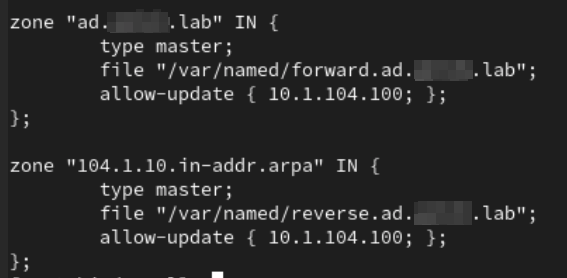
Modify named.rfc1912.zones
sudo vi /etc/named.rfc1912.zonesCreate Foward & Reverse Lookups For Zone With File Definition At Bottom of File
zone "ad.test.lab" IN {
       type master;
       file "/var/named/forward.ad.test.lab";
       allow-update { 10.1.104.100; };   #Domain Controller IP
};

zone "0.104.1.10.in-addr.arpa" IN {
       type master;
       file "/var/named/reverse.ad.test.lab";
       allow-update { 10.1.104.100; };     #Domain Controller IP
};
Verify Configuration Files Have No Issue (No News is Good News)
sudo named-checkconfCreate Forward Lookup File (Tab Delimited) [Space between bind.ad.test.lab and root.ad.test.lab]
sudo vi /var/named/forward.ad.test.lab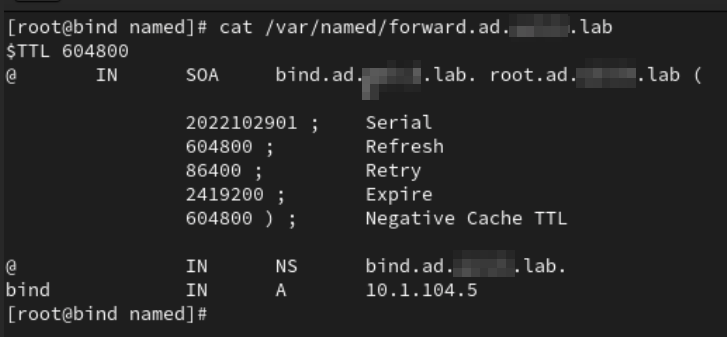
Create Reverse Lookup File (Tab Delimited) [Space between bind.ad.test.lab and root.ad.test.lab]
sudo vi /var/named/reverse.ad.test.lab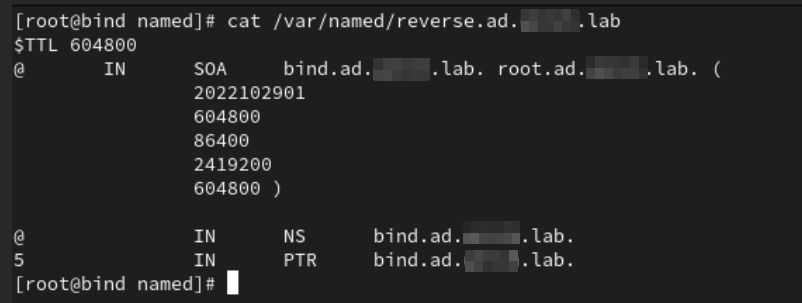
Run Named Checkzone
sudo named-checkzone forward.ad.test /var/named/forward.ad.test.lab
sudo named-checkzone reverse.ad.test /var/named/reverse.ad.test.lab
Restart Named Service
sudo systemctl restart namedAdd Firewall Exception for Port 53
sudo firewall-cmd --permanent --add-port=53/tcp
sudo firewall-cmd --permanent --add-port=53/udp
sudo firewall-cmd --reload
Modify resolv.conf
sudo vi /etc/resolv.conf
search ad.test.lab
nameserver 10.1.104.5
After Verifying Forward & Reverse Works, Set DNS IP Config To Sustain Reboots
sudo nmtui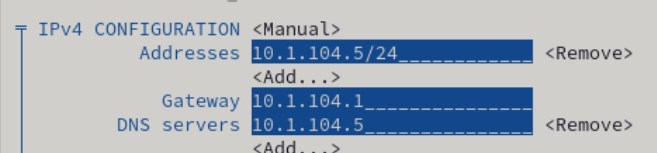
Walk through the GUI and change the DNS Server IP Address to point to yourself. This will make sure through reboots that resolv.conf doesn’t get overwritten back to your old settings.
Bring up a Domain Controller For the Domain
At this point you should be able to bring up a domain controller for the domain name you configured and as long as you configure it with the IP address that you allowed to update those zones you should be able to run a brand new Domain Controller without DNS.
Where we go from here
At this point the next blog will go over setting up GSS-TSIG to allow for dynamic updates from Active Directory clients.