For many things Active Directory runs only as strong as it’s weakest link. If you need to enforce stronger security think about moving legacy items to a legacy domain where older protocols can remain running.
Remove NTLMv1 From Environment:
Work to remove NTLM from the environment, although it may be impossible currently to remove NTLMv2 from the environment, disabling NTLMv1 is a great start.
Disable NTLMv1
Disable IPv6 if not using it
Disable IPv6 on client systems if it is not actively being used as this is a major problem with mitm6 attacks!
Check Group Policy Permissions
Look at all group policies and their permissions. Implement a naming convention if one is not already used and verify who has permissions to which group policies. Make sure no group policies are linked to high-target assets that have low level permissions. Check Group Policies for clear-text passwords.
Check SID-History
Check SID-History in the domain. If it is no longer needed remove it.
Remove Normal User Accounts From Any Administrative Groups
Make sure there are different user accounts for different administration tiers.
AD Administration (OU Admins) – Different Account / Password
VMware Administration – Preferably different domain, bare minimum different account / password
Local Workstation Admin Account – Different Account / Password
Use something like LAPS so no local user accounts and passwords are the same
This is a very easy pivot point for an attacker if they gain control of one system and can use the local administrator or another account to pivot to a bunch of other workstations.
Disable Simple/Unauthenticated Binds
Microsoft recommended turning off simple/unauthenticated binds in 2020 but it is still on in many places.
Reject Simple Authentication and Security Layer (SASL) Binds
Disable NetBIOS & LLMNR Domain Wide
An easy way for hackers to grab hashes and move around in the environment is with responder and NetBIOS and/or LLMNR enabled.
Disable NetBIOS & LLMNR
Investigate using Kerberos FAST Armoring
Investigate using Kerberos FAST Channel for Armoring Pre-Authentication.
Kerberos Fast Armoring
Password Cycle DSRM Password on Domain Controllers
Password cycle the DSRM password on all domain controllers, can be different or can be the same. You can sync this password from a Domain User account
Remove all unnecessary software from Domain Controllers
Anything with an agent is a potential path to compromise, think MECM. MECM can push software and make configuration changes, if MECM becomes compromised so do your DCs. VMware Tools may be a necessary evil but make sure that software is patched every month with Windows Patches.
Service Account Password Changes:
Take inventory of all service accounts in the domain. Document which service accounts are used by whom and for what purpose. Verify least privilege, and change the password yearly. This will keep documentation up to date and in the event of an attack you aren’t fumbling to figure out how to update the password and who is in charge of it.
Check for Group Managed or Managed Service Accounts:
Check the domain for use of Group Managed or Managed Service Accounts. Make sure this is documented somewhere.
Check for Constrained/Unconstrained Delegation
Check for Unconstrained or Constrained Delegation. If using unconstrained delegation and needed move to constrained delegation. Make sure the service account being used for constrained delegation is SUPER long to prevent kerbroasting.
ms-DS-MachineAccountQuota
By default in Active Directory this value is set to “10” which allows ANY user in Active Directory to bind ten machines to the domain. In the beginning stages of Active Directory maybe there was a need for this but now its just a big security risk.
Recommendation: Set this to zero
Add New Domain Controller Policy
By default, the “Default Domain Controllers Policy” allows anyone in “NT AUTHORITY\Authenticated Users” to bind machines to the Domain. Create a new GPO with locked down policy rights and link it to the Domain Controllers or Tier0 OU, make sure it is linked as a higher policy “link order”. The highest link order will win.
Protected Users Group
Look at highly privileged accounts and add them to the Protected Users Group if they are compatible with the protections that this group provides.
Recommendation: Add any real user accounts that are at Domain Admin or higher. (Enterprise Admins, Schema Admins, etc.)
krbtgt Account Password
Check the last time this password was changed and if it wasn’t changed in the last 180 days, change it. If someone has access to an Active Directory backup they can potentially own this account and if the password is never changed, own the domain.
Recommendation: Make sure you setup a schedule to recycle this password twice a year. This account holds two passwords so when you change the password you should change it twice, ideally 24 hours apart. That is a total of four password changes a year.
Verify SSL Certificates Exist on the Domain Controllers
Verify that valid certificates are in place for LDAPS calls over port 636. As part of this process investigate and try to remove any traffic that is talking on LDAP port 389.
Recommendation: Use either an internal PKI or public facing certificates to make sure all ldaps traffic is talking Active Directory over a secure connection.
Check if Exchange ExtensionAttributes were installed
If “ExtensionAttribute1” -> “ExtensionAttribute15” are in the schema of User/Computer/Group objects, check to see if any of them are in use.
Recommendation: If they are try to document what they are being used for and which ones are free and able to be used.
Check the Default Computer/User Bind OU
The default container for computer objects is (CN=Computers,DC=DOMAIN,DC=COM). This container cannot have group policy applied to it and objects should be set to write to another OU that can be better managed.
Excerpt from Microsoft here: Redirect users and computers containers – Windows Server | Microsoft Learn
“In a default installation of an Active Directory domain, user, computer, and group accounts are put in CN=objectclass containers instead of a more desirable OU class container. Similarly, the accounts that were created by using earlier-version APIs are put in the CN=Users and CN=computers containers.”
“Some applications require specific security principals to be located in default containers like CN=Users or CN=Computers. Verify that your applications have such dependencies before you move them out of the CN=users and CN=computes containers.”
Recommendation: If these items can be re-directed, redirect them to a different OU and make sure proper OU security is set.
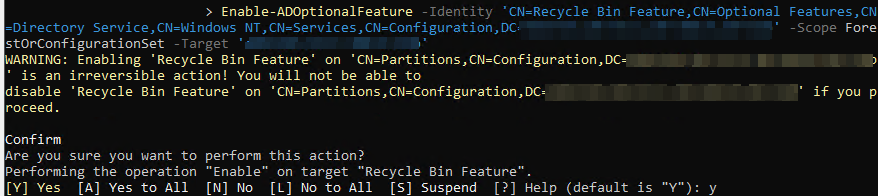
Check Tombstone Lifetime / AD Recycle Bin
If the Active Directory Recycle Bin is not enabled, enable it!
The following PowerShell code can be used to see what the current Tombstone Lifetime is:
Write-Output “Get Tombstone Setting `r”
Import-Module ActiveDirectory

$ADForestconfigurationNamingContext = (Get-ADRootDSE).configurationNamingContext
$DirectoryServicesConfigPartition = Get-ADObject -Identity “CN=Directory Service,CN=Windows NT,CN=Services,$ADForestconfigurationNamingContext” -Partition $ADForestconfigurationNamingContext -Properties *
$TombstoneLifetime = $DirectoryServicesConfigPartition.tombstoneLifetime

Write-Output “Active Directory’s Tombstone Lifetime is set to $TombstoneLifetime days `r “
Note that no value returned means the tombstone lifetime setting is set to 60 days (default for AD forests installed with Windows 2003 or older).
Recommendation: If it is not set to 180 days, set it to 180 days. If the AD recycle bin is not enabled, enable it!
Check to see if Sysmon is installed on the Domain Controllers
Recommendation: If Sysmon is not installed, work on getting it installed and configured on the Domain Controllers at a bare minimum to provide more insight.
Check Domain Controller Firewall Settings
This may require a conversation with your Information Security team to understand how the Firewalls are configured that sit in front of the Domain Controllers. You want to make sure the bare minimum number of ports are enabled for client traffic and that admin ports are only able to be accessed by admins.
Recommendation: Review security with Information Security Team, and enable the Windows Firewall on all Domain Controllers and manage it with Group Policy. This also acts as an East/West traffic block so if someone gets into one server on the prod network they don’t automatically have RDP access per say to another DC on the same network segment. Setup monitoring for any RDP sessions, successful ones, and failures (including firewall logs). This will verify anyone RDP’ing to the DCs is legit, and will also help track down threat actors on the network. One of the first things threat actors will try to do is see if they have RDP access to the Domain Controllers, this is good information to send to the SOC or InfoSec.
Check to see if RPC Ports are restricted
Recommendation: If RPC Ports have not been limited on the Domain Controllers, limit them to a few ports, say 100, or 1,000, and then make the associated changes to firewall rules.
Check Time Settings on the Domain Controller running PDC Emulator
Many people know that the clients that talk to the Domain Controllers have to have the correct time, but it is super important that you are pulling a correct time source for your Domain Controllers.
Recommendation: Make sure the Domain Controllers, more specifically the Domain Controller with the PDC FSMO role is pulling its time from a trusted source. It might also be worth writing a script to monitor this as well.
Verify FSMO Role Holder(s), Global Catalog Servers, & Backups
Verify who is running the FSMO roles for your Domain(s). Make all DCs a Global Catalog if you have a single-domain forest. Verify how AD is being backed up.
Recommendation: Depending on your specific situation you may not be able to run all FSMO roles on one DC. In my jobs I have been able to. This allows you to target this DC as the DC to be backed up, snapshotted, etc. If you are running a single-domain forest, make sure all DCs are a global catalog.
Check Trusts
Check to see if there are any trusts configured for the domain.
Recommendation: If there are any trusts, figure out if they are still needed, and make sure there is documentation on why these trusts are setup and when they can be unconfigured.
Check Sites & Services for IP Configuration
Check AD Sites & Services for configuration of IP ranges. Make yourself familiar with how this setup and why it is setup the way it is.
Recommendation: Take notes on if Sites & Services is being used. If it is being used understand the network ranges and why it is configured the way it is. If priority is being given, understand why.
Turn off Print Spooler on Domain Controllers / High Level Servers
Turn off the Print Spooler on Domain Controllers and any other Tier0 servers like Azure Entra Sync.
Turn On Alerting for High Level Groups / Logins
Alert on logins to Domain Controllers, alert on logins using Domain Admin credentials. Alert if anyone gets added to Enterprise Admins, Schema Admins, Domain Admins, Administrators, or any other high level groups.
Lock down highly priviliged accounts to only the systems they need to be able to login to
Make sure high level accounts can only login to the systems they need to. For example Domain Admin accounts can only login to the Domain Controllers and privileged workstations/servers to administer AD.