The homelab starts to get real when you can setup an e-mail relay so you can get the same kind of notifications that you get in your work QA or Prod environments.
There are many ways to go about setting up an e-mail relay but this is the process I used and it is working well for me. The only cost that I’m out was the cost of a domain that I already had and was paying for.
The first step is to setup an account with mailgun, I chose the free plan which allows you to send up to 100 e-mails a day (more than enough for my homelab) and I believe it only lets you send to five verified e-mail addresses (Again, more than enough for my homelab). The setup of the account and the configuration of pulling your own domain in is very straight forward I’m not going to go into that here.
However, the next step is to bring up an actual relay server, which I was not familiar with and wanted to blog about. I’m using Ubuntu 24.04 LTS and utilizing postfix to do this.
Install Ubuntu 24.04 LTS
I did a default install of Ubuntu 24.04 LTS, choosing all the default options and not choosing any additional add ons.
You can then install postfix
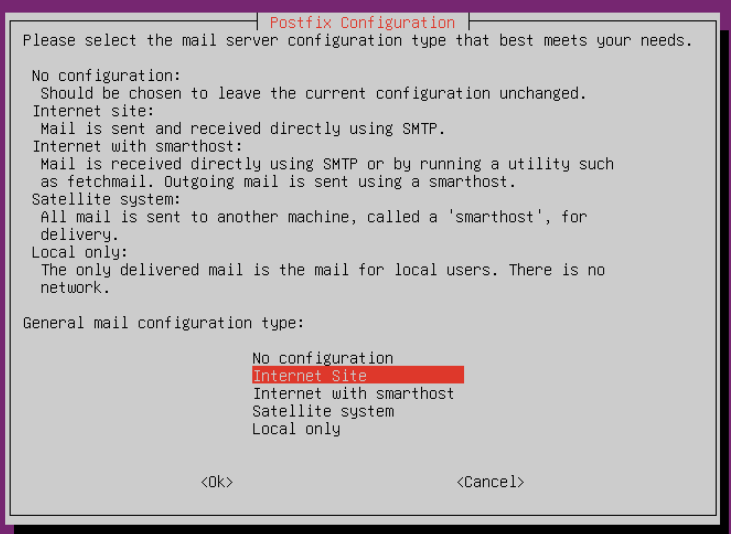
sudo apt install postfixWhen prompted choose “Internet Site” which is the default
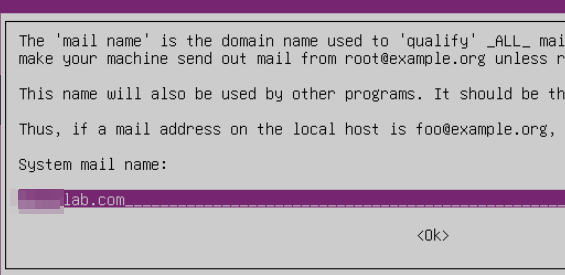
You can then input the fully qualified domain name of the name you plan to send e-mail as
I then added the following to the /etc/postfix/main.cf configuration file
Underneath smtp_tls_session_cache_database add the following line
smtp_tls_note_starttls_offer = yesChange the myhostname = to be your hostname that is fully qualified and able to be looked up by your local DNS server
Change mydestination to equal “localhost.localdomain, localhost”
Change relayhost to be what was provided by mailgun it will probably be similiar to: smtp.mailgun.org:587
Underneath relayhost add the following lines (change the e-mail to be what you will be sending e-mail from in Mailgun, could be [email protected] for example, after the : is your password for that account that was setup in mailgun).
smtp_sasl_auth_enable = yes
smtp_sasl_password_maps = static:[email protected]:PASSWORD
smtp_sasl_security_options = noanonymous
Change mynetworks to equal the home network that you will be sending e-mail to the relay from (ex. 192.168.0.0/24)
You can now restart postfix with: sudo systemctl restart postfix
If you would like to view a sample main.cf file on my github located here: https://github.com/paularquette/HomeLabProjects/blob/main/ubuntu-postfix/main.cf
You can then send all e-mails to your relay server that your local DNS knows it by (relay.domainname.com) on port 25, and your relay will server will send them out to mailgun to have them delivered.
Note: You will have to setup the e-mail addresses you want to be able to send to in Mailgun, and accept the invite so mailgun will actually deliver the e-mail. Your first e-mail may show up as spam but I’ve had no issues after making the e-mail sender as not spam.


