Change ms-DS-MachineAccountQuota to Zero
This attribute allows all users in the Domain to bind 10 computer objects to the Domain that they control. This could actually lead to more than 10 computer objects since every computer object is also technically a user. Best practices is to disable this setting and set it to Zero.
You can run the following command to see if your domain is currently configured as default of 10 objects:
Get-ADObject -Identity ((Get-ADDomain).distinguishedName) -Properties ms-DS-MachineAccountQuota

If you are currently set to 10 and want to fall in line with best practices you can run the following command to change this attribute to Zero:
Set-ADDomain -Identity ((Get-ADDomain).distinguishedName) -Replace @{“ms-DS-MachineAccountQuota”=”0”}
You will not be provided any feedback, you can then run the first command again to verify things are set to Zero.
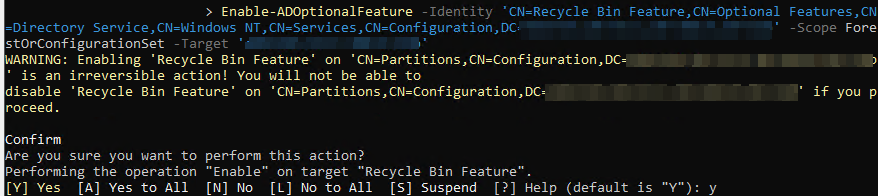
Enable Recycle Bin
To enable the Recycle Bin you can run the following command (Replace DOMAIN.COM and make sure quotes copy):
Enable-ADOptionalFeature -Identity “CN=Recycle Bin Feature,CN=Optional Features,CN=Directory Service,CN=Windows NT,CN=Services,CN=Configuration,DC=DOMAIN,DC=COM” -Scope ForestOrConfigurationSet -Target “DOMAIN.COM“
Create Key for gMSA Accounts
When you bring up a new domain you will need to create the KDSRootKey for group managed service accounts.
Add-KdsRootKey -EffectiveImmediately

KDS root keys are stored in: CN=Master Root Keys,CN=Group Key Distribution Service,CN=Services,CN=Configuration,DC=<forest name>;
Enable Central Store in Group Policy
Create the “PolicyDefinitions” folder in SYSVOL

Once enabled, copy the files from C:\Windows\PolicyDefinitions into this folder
Install & Configure LAPS
You can verify you have the AD Schema updated for LAPS by running:
Update-LapsADSchema
You can verify that the LAPS GPOs are in Computer Configuration > Administrative Templates > System > LAPS
Create Group Policy Security Baseline for Domain Controllers
Download the Windows Server 2022 Security Baseline from Microsoft: https://www.microsoft.com/en-us/download/details.aspx?id=55319
Copy these files to a Domain Controller for example in C:\Temp
Copy the files from \Templates directory into the PolicyDefinitions folder in SYSVOL
In the \Scripts directory run the .\Baseline-ADImport.ps1 file to import the GPOs
Modify the firewall rules to enforce only the rules you specify:
- Turn off Rule Merging for all profiles
- Turn on firewall log with max size 32,767 for all profiles
- Log dropped and successful packets for all profiles
- Input Firewall Rules
- ICMP (Ping Allow)
- TCP/UDP 53 (DNS)
- TCP/UDP 88 (Kerberos)
- UDP 123 (Time Service)
- TCP/UDP 135 (RPC Mapper)
- TCP/UDP 389 (LDAP)
- TCP 445 (SMB)
- TCP/UDP 464 (Kerberos Password Change)
- TCP 636 (LDAPS)
- TCP 3268/3269 (Global Catalog)
- TCP 49152-65535 (RPC Dynamic Range) [Will modify this later]
- TCP/UDP 3389 (RDP) [Locked to Trusted IPs]
- TCP 5985/5986 (WinRM) [Locked to Trusted IPs]
- TCP 9389 (AD Web Services) [Locked to Trusted IPs]
Manually create the firewall logs on the DCs by launching Windows Defender Firewall, Go to the Log Settings and click “OK”
Create Another GPO or Add These Settings to the Current GPO
Navigate to Computer Configuration > Policies > Windows Settings > Security Settings > System Services > Print Spooler
Define this policy and set the service startup mode to Disabled
Navigate to Computer Configuration > Preferences > Windows Settings > Registry (Use Update HKLM)
SYSTEM\CurrentControlSet\Control\SecurityProviders\SCHANNEL\Ciphers\Triple DES 168\Enabled 0
SYSTEM\CurrentControlSet\Control\SecurityProviders\SCHANNEL\SSL 3.0\Server\Enabled 0
SYSTEM\CurrentControlSet\Control\SecurityProviders\SCHANNEL\TLS 1.0\Server\Enabled 0
SYSTEM\CurrentControlSet\Control\SecurityProviders\SCHANNEL\TLS 1.1\Server\Enabled 0
SYSTEM\CurrentControlSet\Control\SecurityProviders\SCHANNEL\TLS 1.2\Server\DisabledByDefault 0
SYSTEM\CurrentControlSet\Control\SecurityProviders\SCHANNEL\TLS 1.2\Server\Enabled 1