Tag Archives: Windows Server

Installing Okta AD Agent 3.22 with gMSA – Blank Error Message

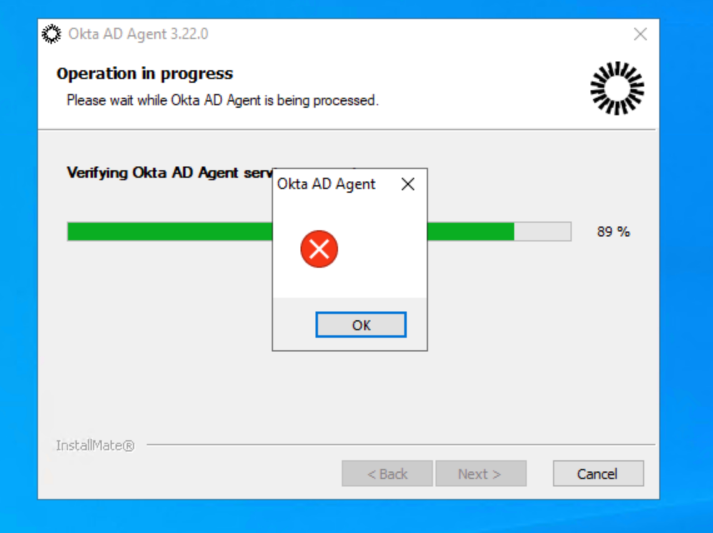
When attempting to install the Okta Active Directory (AD) Agent you may come across a very non-specific error message that literally tells you nothing. (see below)

Digging into the install logs in C:\Program Files (x86)\Okta\Okta AD Agent\logs sadly doesn’t get you to much further to figuring out what is going on. See a code snippit below.

026/05/17 18:11:36.625-04:00 Error -- SERVER_NAME -- Unexpected error: A specified logon session does not exist. It may already have been terminated.

2026/05/17 18:11:36.625-04:00 Error -- SERVER_NAME -- Received System.Security.SecurityException: A specified logon session does not exist. It may already have been terminated.

   at System.Security.Principal.WindowsIdentity.KerbS4ULogon(String upn, SafeAccessTokenHandle& safeTokenHandle)
   at System.Security.Principal.WindowsIdentity..ctor(String sUserPrincipalName, String type)
   at System.Security.Principal.WindowsIdentity..ctor(String sUserPrincipalName)
   at Okta.Agent.Installation.AgentCli.UserUtility.CheckSvcUserPermissions(String username)
   at Okta.Agent.Installation.AgentCli.ConfigCli.VerifySvcUser()
   at Okta.Agent.Installation.AgentCli.ConfigCli.Execute(ConfigurationScope scope, String[] args)
The Zone of the assembly that failed was:
MyComputer

Resolution:

The resolution to this issue is to remove the user that is running the installer from the Protected Users group in Active Directory. I wish Okta’s error reporting was a little more helpful and this took longer than I’d like to admit to track down.

Bringing up a new Active Directory Domain Series (Server 2022) [Part 1]

Change ms-DS-MachineAccountQuota to Zero

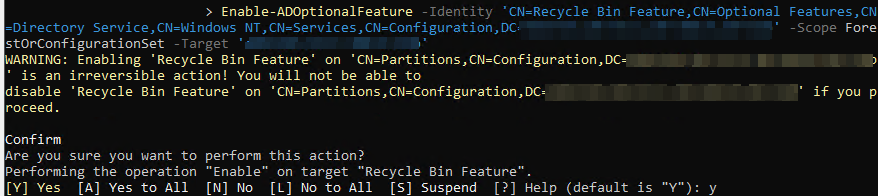
This attribute allows all users in the Domain to bind 10 computer objects to the Domain that they control. This could actually lead to more than 10 computer objects since every computer object is also technically a user. Best practices is to disable this setting and set it to Zero.

You can run the following command to see if your domain is currently configured as default of 10 objects:

Get-ADObject -Identity ((Get-ADDomain).distinguishedName) -Properties ms-DS-MachineAccountQuota

If you are currently set to 10 and want to fall in line with best practices you can run the following command to change this attribute to Zero:

Set-ADDomain -Identity ((Get-ADDomain).distinguishedName) -Replace @{“ms-DS-MachineAccountQuota”=”0”}

You will not be provided any feedback, you can then run the first command again to verify things are set to Zero.

Enable Recycle Bin

To enable the Recycle Bin you can run the following command (Replace DOMAIN.COM and make sure quotes copy):

Enable-ADOptionalFeature -Identity “CN=Recycle Bin Feature,CN=Optional Features,CN=Directory Service,CN=Windows NT,CN=Services,CN=Configuration,DC=DOMAIN,DC=COM” -Scope ForestOrConfigurationSet -Target “DOMAIN.COM

Create Key for gMSA Accounts

When you bring up a new domain you will need to create the KDSRootKey for group managed service accounts.

Add-KdsRootKey -EffectiveImmediately

KDS root keys are stored in: CN=Master Root Keys,CN=Group Key Distribution Service,CN=Services,CN=Configuration,DC=<forest name>;

Enable Central Store in Group Policy

Create the “PolicyDefinitions” folder in SYSVOL

Once enabled, copy the files from C:\Windows\PolicyDefinitions into this folder

Install & Configure LAPS

You can verify you have the AD Schema updated for LAPS by running:

Update-LapsADSchema

You can verify that the LAPS GPOs are in Computer Configuration > Administrative Templates > System > LAPS

Create Group Policy Security Baseline for Domain Controllers

Download the Windows Server 2022 Security Baseline from Microsoft: https://www.microsoft.com/en-us/download/details.aspx?id=55319

Copy these files to a Domain Controller for example in C:\Temp

Copy the files from \Templates directory into the PolicyDefinitions folder in SYSVOL

In the \Scripts directory run the .\Baseline-ADImport.ps1 file to import the GPOs

Modify the firewall rules to enforce only the rules you specify:

  1. Turn off Rule Merging for all profiles
  2. Turn on firewall log with max size 32,767 for all profiles
  3. Log dropped and successful packets for all profiles
  4. Input Firewall Rules
    • ICMP (Ping Allow)
    • TCP/UDP 53 (DNS)
    • TCP/UDP 88 (Kerberos)
    • UDP 123 (Time Service)
    • TCP/UDP 135 (RPC Mapper)
    • TCP/UDP 389 (LDAP)
    • TCP 445 (SMB)
    • TCP/UDP 464 (Kerberos Password Change)
    • TCP 636 (LDAPS)
    • TCP 3268/3269 (Global Catalog)
    • TCP 49152-65535 (RPC Dynamic Range) [Will modify this later]
    • TCP/UDP 3389 (RDP) [Locked to Trusted IPs]
    • TCP 5985/5986 (WinRM) [Locked to Trusted IPs]
    • TCP 9389 (AD Web Services) [Locked to Trusted IPs]

Manually create the firewall logs on the DCs by launching Windows Defender Firewall, Go to the Log Settings and click “OK”

Create Another GPO or Add These Settings to the Current GPO

Navigate to Computer Configuration > Policies > Windows Settings > Security Settings > System Services > Print Spooler

Define this policy and set the service startup mode to Disabled

Navigate to Computer Configuration > Preferences > Windows Settings > Registry (Use Update HKLM)

SYSTEM\CurrentControlSet\Control\SecurityProviders\SCHANNEL\Ciphers\Triple DES 168\Enabled 0

SYSTEM\CurrentControlSet\Control\SecurityProviders\SCHANNEL\SSL 3.0\Server\Enabled 0

SYSTEM\CurrentControlSet\Control\SecurityProviders\SCHANNEL\TLS 1.0\Server\Enabled 0

SYSTEM\CurrentControlSet\Control\SecurityProviders\SCHANNEL\TLS 1.1\Server\Enabled 0

SYSTEM\CurrentControlSet\Control\SecurityProviders\SCHANNEL\TLS 1.2\Server\DisabledByDefault 0

SYSTEM\CurrentControlSet\Control\SecurityProviders\SCHANNEL\TLS 1.2\Server\Enabled 1

Replacing SSL Certificates with Built-In Windows Server OS Certificate Binding

If you have an application running on your Windows Server OS that is not using IIS as a front-end, it may be relying on the built-in Certificate Binding in Windows.

In order to check the certificate bindings you can run:

netsh http show sslcert

If you need to update one of the certificates listed here you can run:

netsh http update sslcert ipport=0.0.0.0:443 certhash=certhash appid=”{appid}”

Note: ipport, appid will be given to you with the first command to look at the certs, use the values of the current cert that is/was working. Make sure the certhash is the new certificate you want to be used here.

SQL Server Failover Cluster Instance Install Failed Permissions

I’ve seen a lot of posts out there for the error message we had but no actual solutions for our particular issue.

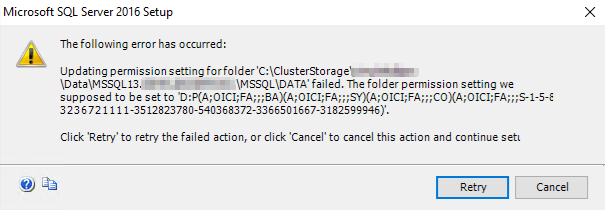
If you are attempting to install a new instance of SQL Server on your failover cluster, do make sure you are not installing into the Root folder of C:\ClusterStorage\<symlink>. You must make sure you create another directory underneath (We disabled inheritance too).

You probably landed here due to Googling this:

The following error has occurred:

Updating permission setting for folder ‘C:\ClusterStorage\<symlink>\Data\MSSQL13.<DBNAME>\MSSQL\DATA’ failed. The folder permission setting we supposed to be set to ‘D:P(A;OICI;FA;;;BA)(A;OICI;FA;;;SY)(A;OICI;FA;;;CO)(A;OICI;FA;;;S-1-5-80-xxxxxxx)’.

Click ‘Retry’ to retry the failed action or click ‘Cancel’ to cancel this action and continue setup.

Resolution:

The resolution to this problem for us was super super simple. We were not running the installer “As Administrator”. If you are running into this issue try running the installer As Administrator.