I had a lot of blogs that didn’t get posted that I wanted to get published this year. This was a year of relaxation. I took a lot of time for myself this year. Here’s to hoping I can spend more time to get more quirky issues posted in 2024.
I had 29,000 visitors visit my blog this year! That’s a lot of people from all over the world swinging by to say “Hi”. Hopefully you all found something useful here.
As far as days of the week go, Tuesdays are the day this site got the most hits this year.
One of my major tasks when I started my new job was to automate our Windows Server patching so I wouldn’t have to be up two nights every month to deal with patching.
All of our Windows Servers have SCCM clients on them, and we manage the patching software push and the maintenance windows for the servers to reboot with MECM. These servers are members of AD groups that are used to correlate to Device Collection in MECM. This is important because these same AD groups are used for custom scripts below.
This blog is not going to go over approving and downloading patches, setting maintenance windows, or deployment settings.
Things Done Before Automated Patch Run:
We set the Installation Deadline of patches to 2 hours before the Maintenace window (reboot).
We run a custom script on all boxes through SCCM before patching to clear the CCM Cache folder. This helps prevent running out of storage space in Windows. Our OS disks are not very big.
Set the Maintenance Schedule in Operations Manager (SCOM), so the boxes will not report issues during the patch window.
Set the custom scripts on our scripting server to force patch installs and check services.
Set time aside to manually patch the boxes that cannot be automated (i.e. Domain Controllers, etc.)
Custom Scripts For Patching:
These two scripts are pinned in Task Scheduler and uses and an AD Service account that has local admin on the servers. (This is not meant for Domain Controllers, DA would be needed).
A template for the script we use to force servers to install patches is located here:
This script will basically make sure that the servers start installing patches at the time we have it run in Task Scheduler from our scripting server (Typically a few minutes after the 2 hours prior that we schedule). This requires WinRM ports open from the scripting server to the server endpoints that are being updated.
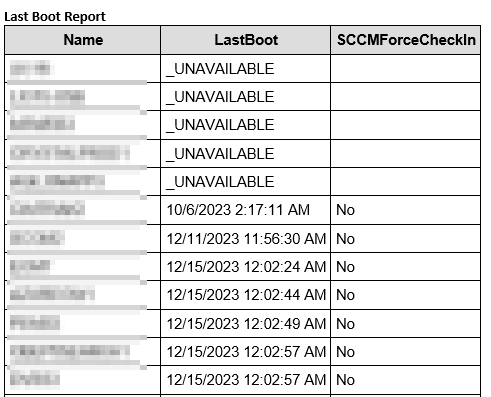
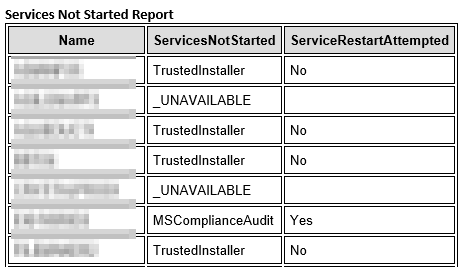
A template for the script we use to monitor the patch deployment, force MECM check-in and auto start services is here:
This script we schedule to run about 20 minutes after the maintenance window starts and have it continue to run every 20 minutes until the maintenance window completes. This is a LOT of e-mails and I have not edited the script yet to just write to a log file but that would be easy enough to do. This script will report back last boot, and any attempts to either force SCCM check-in, or restart any services that failed to start.
By default if the box restarted over 25 minutes ago but not over 4 hours ago it will force an MECM check-in so the patch compliance report the next morning is accurate.
By default if the box restarted over 25 minutes ago but not over 4 hours ago, any Automatic services that are not started will be attempted to be restarted. Services can be whitelisted, so the script does not act on them.
Over the holiday break here I wiped and upgraded my personal Macbook which is still an Intel Mac to the latest OS, currently Sonoma 14.2.1.
Upon trying to set up a TimeMachine backup location on my synology NAS I noticed I could no longer authenticate to my Synology NAS.
In Finder, I was using Connect to Server, smb://ipaddress
It would recognize something was there and prompt for credentials but it would not take the correct username and password I was inputting it just kept prompting.
Edit:
This was a freshly wiped Mac with no settings on it at all, setup as a new Mac. The DSM version I was running was DSM 7.1-42661 Update 4. I have a DS920+.
I have since updated my DSM version to the latest (DSM 7.2.1-69057 Update 1). I can no longer replicate the issue, but not sure if after you authenticate for the first time you can’t replicate it anymore? Very weird.
Resolution:
I found on another article somewhere on the web to capitalize a letter in the username. I thought this sounded funny but it actually worked. I capitalized the first letter in my username, and then it allowed me to connect.
If you want to iterate through data, I’m using $Var3 in this template for that purpose. You can see under Global Variables & Input Files I’m creating an empty array for $Var3 ($Var3 = @())
To see this script work, you would just need to have data to iterate through and add it to a PSObject as you can see in my commented out line under “Start Script Programming”
I just recently upgraded my blog from Ubuntu 20.04 LTS to 22.04 LTS and my main blog WordPress site would not load.
The php code was showing in the browser rather than being processed by php.
<?php
/**
* Front to the WordPress application. This file doesn’t do anything, but loads
* wp-blog-header.php which does and tells WordPress to load the theme.
...
First, make sure that the libapache2-mod-php8.1 module is installed:
sudo apt install libapache2-mod-php8.1
Next browse to /etc/apache2/mods-enabled, and do an ls:
You will probably see two old php symlinks that don’t go anywhere anymore. If you look in the mods-available directory you will see they don’t exist.
We need to create two new symlinks for php8, do an ls in mods-available to make sure you see two php files
Create the symlinks in mods-enabled for the two in mods-available and restart apache2. This was done in the mods-enabled directory.
sudo service apache2 restart
If this works feel free to delete the old symlinks with just the “rm” command.
Reboot the virtual appliance, and immediately after the OS starts, press e to open the GNU GRUB Edit Menu.
Locate the line that begins with the word linux.
Option 1
At the end of the line, add fsck.repair=yes then reboot the appliance. This will force the default filesystem check to auto-resolve any issues, and does not require emergency mode.
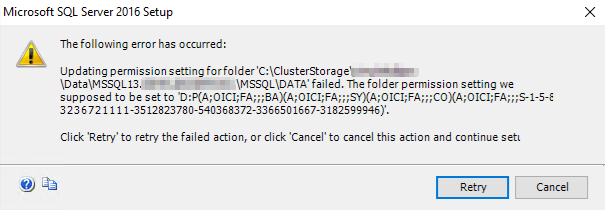
I’ve seen a lot of posts out there for the error message we had but no actual solutions for our particular issue.
If you are attempting to install a new instance of SQL Server on your failover cluster, do make sure you are not installing into the Root folder of C:\ClusterStorage\<symlink>. You must make sure you create another directory underneath (We disabled inheritance too).
You probably landed here due to Googling this:
The following error has occurred:
Updating permission setting for folder ‘C:\ClusterStorage\<symlink>\Data\MSSQL13.<DBNAME>\MSSQL\DATA’ failed. The folder permission setting we supposed to be set to ‘D:P(A;OICI;FA;;;BA)(A;OICI;FA;;;SY)(A;OICI;FA;;;CO)(A;OICI;FA;;;S-1-5-80-xxxxxxx)’.
Click ‘Retry’ to retry the failed action or click ‘Cancel’ to cancel this action and continue setup.
Resolution:
The resolution to this problem for us was super super simple. We were not running the installer “As Administrator”. If you are running into this issue try running the installer As Administrator.
If you are taking over an Active Directory or just trying to run cleanup on one that you currently manage, one of the tasks you will probably want to perform is to check to see which of the built-in schema ExtensionAttributes are in use.
If you don’t have ExtensionAttributes 1-15 in your On Premises Active Directory you will need to extend your schema for Exchange Server.
The script below has also been added to my github.
We ran into an issue with Macs connecting to our file services while attempting an upgrade on a Microsoft Clustering Services File Services on Server 2012R2.
Current Environment:
Two 2012R2 Servers/Two 2016 Servers, with the following Roles/Features Installed:
ROLES – File and Storage Services:
File Server
DFS Namespaces
DFS Replication
File Server Resource Manager
FEATURES
Failover Clustering
Testing:
Two Virtual Machines running 2012R2, with Microsoft Clustering Services, with multiple File Server Roles. Everything works with the Macs connecting to these Clustered File Services while running 2012R2. The cluster level is also 2012R2.
However, after adding a 2016 Server into this Microsoft Cluster, and failing over one of the file server roles to it, the Macs can no longer connect to that file server. They receive a message stating:
There was a problem connecting to the server “”. Check the server name or IP address, and then try again. If you continue to have problems, contact your system administrator.
If you migrate the file server role back to a server running 2012R2 the Mac can once again connect.
Resolution:
I plan to come back to this blog to post a more detailed writeup. I was passed on a lot of information that I haven’t seen but I will try to best to explain what I believe is happening.
When a 2016 Server is added to a 2012R2 only cluster, the cluster moves into “Mixed Mode” to allow both Operating Systems to function. Now Microsoft states you should not stay in this mode very long, from what I’ve seen thrown around no more than 4 weeks.
This is hearsay from packet captures but when a Mac tries to connect to the File Services running on 2016 Server while in mixed mode it supposedly connects on SMB 3.1.1, but then something in the network stack wants to downgrade the connection to SMB 2.0, and the Macs cannot follow it and therefore cannot connect to the server.
However, after removing the 2012R2 servers, and then upgrading the Cluster Level to 2016, the Macs can then connect again.
I’m still doing some troubleshooting and this post will be updated.
If you run into errors stating that the server you are logging into cannot pull or connect to the RDS licensing server check to see how you are connecting to it.
For example if you are using a CNAME “alias” record to get to the server you may run into issues with DNS resolution and proper authentication.