Author Archives: paularquette

Pop OS! 22.04 LTS – Pop Shop Crashing on Installing Apps

If you notice that Pop Shop is crashing when you are trying to install an application check your free space! There is a very real chance that you are running low on space. The OS will not notify you it will just crash the app.

A colleague of mine was running into this problem. His home directory was on a separate partition and there was not enough free space.

You can run Pop Shop in the terminal by running: io.elementary.appcenter 

By running it in the terminal you should be able to see any output if there are errors when you are trying to perform certain tasks.

Django 4.0 Install on Ubuntu 20.04

These are my notes for bringing up Django Install on a Production Server. These notes were written on a fresh install of Ubuntu 20.04. Most of my notes are coming from this Digital Ocean article with a few changes: https://www.digitalocean.com/community/tutorials/how-to-set-up-django-with-postgres-nginx-and-gunicorn-on-ubuntu-20-04

NOTE: Once this step is completed and you make changes you will need to restart gunicorn to see the changes on the production server.

sudo systemctl restart gunicorn

Install Packages for Python3 (Include Git if its not already installed and venv)

sudo apt update
sudo apt install python3-pip python3-dev python3-venv libpq-dev postgresql postgresql-contrib nginx curl git

Create PostgreSQL Database & User

Login to Postgres Session:

sudo -u postgres psql

Create Database & User:

CREATE DATABASE myproject;
CREATE USER myprojectuser WITH PASSWORD 'password';

Change settings for Django:

Set default encoding to UTF-8
Block uncomitted transactions
Set timezone to UTC

ALTER ROLE myprojectuser SET client_encoding TO 'utf8';
ALTER ROLE myprojectuser SET default_transaction_isolation TO 'read committed';
ALTER ROLE myprojectuser SET timezone TO 'UTC';

Grant all privs on database to user:

GRANT ALL PRIVILEGES ON DATABASE myproject TO myprojectuser;

Quit PostgreSQL:

\q

Create Home Directory for Django Apps & Install Django

mkdir djangoweb
mkdir djangoweb/myprojectdir
python3 -m venv /home/<user>/djangoweb/myprojectdir/env

Activate Virtual Environment & Install Django/Gunicorn

source ~/djangoweb/myprojectdir/env/bin/activate
pip install django gunicorn psycopg2-binary

Start Django Project

django-admin startproject myproject ~/djangoapps/myprojectdir

Edit settings.py

Add DNS Name(s), IP(s), and localhost to the “ALLOWED_HOSTS” area. Put in single quotes:

ALLOWED_HOSTS = ['dns1.dns.org','xxx.xxx.xxx.xxx.','localhost']

Add PostgreSQL Database Information

DATABASES = {
    'default': {
        'ENGINE': 'django.db.backends.postgresql_psycopg2',
        'NAME': 'myproject',
        'USER': 'myprojectuser',
        'PASSWORD': 'password',
        'HOST': 'localhost',
        'PORT': '',
    }
}

Add static file location, needed for nginx (bold items). This tells django to place them in a directory called static in the base project directory:

STATIC_URL = '/static/'
import os
STATIC_ROOT = os.path.join(BASE_DIR, 'static/')

Complete Project Setup

#Create Default Database Migrations
python manage.py makemigrations
python manage.py migrate

#Create Administrative User
python manage.py createsuperuser

#Collect All Static Material into Defined Static Folder
python manage.py collectstatic

#Deactivate your virtual instance
deactivate

Configure GUnicorn

Create a GUnicorn systemd socket

sudo nano /etc/systemd/system/gunicorn.socket

/etc/systemd/system/gunicorn.socket

[Unit]
Description=gunicorn socket

[Socket]
ListenStream=/run/gunicorn.sock

[Install]
WantedBy=sockets.target

Create GUnicorn systemd service file

sudo nano /etc/systemd/system/gunicorn.service

/etc/systemd/system/gunicorn.service

[Unit]
Description=gunicorn daemon
Requires=gunicorn.socket
After=network.target

[Service]
User=<user>
Group=www-data
WorkingDirectory=/home/<user>/myprojectdir
ExecStart=/home/<user>/myprojectdir/myprojectenv/bin/gunicorn \
          --access-logfile - \
          --workers 3 \
          --bind unix:/run/gunicorn.sock \
          myproject.wsgi:application

[Install]
WantedBy=multi-user.target

Start and enable GUnicorn Socket. This will create the socket file at: /run/gunicorn.sock now and at boot time. When a connection is made it will automatically start the service.

sudo systemctl start gunicorn.socket
sudo systemctl enable gunicorn.socket

Configure Nginx to Proxy Pass to Gunicorn

sudo nano /etc/nginx/sites-available/myproject

/etc/nginx/sites-available/myproject

server {
    listen 80;
    server_name server_domain_or_IP;

    location = /favicon.ico { access_log off; log_not_found off; }
    location /static/ {
        root /home/<user>/myprojectdir;
    }

    location / {
        include proxy_params;
        proxy_pass http://unix:/run/gunicorn.sock;
    }
}

Enable File by linking it to sites-enabled

sudo ln -s /etc/nginx/sites-available/myproject /etc/nginx/sites-enabled

Check for Errors

sudo nginx -t

If no errors restart nginx

sudo systemctl restart nginx

Punch a hole in UFW for Nginx

sudo ufw allow 'Nginx Full'

Forcing ADFS 3.0 to run TLS 1.2

If you haven’t already forced ADFS to run on TLS 1.2 you are behind the curve. Activating TLS 1.2 on ADFS and turning off all other vulnerable services is relatively easy.

Step 1: Disable SSL 2.0, SSL 3.0, TLS 1.0, TLS 1.1, RC4 & Enable Strong Auth for .NET

The first step that always goes unsaid is to snapshot your Virtual Machines or get a solid backup state before making any changes to a running production environment. The next unsaid step is to perform these activities on a test/dev environment before taking down Production!

SSL 2.0 and SSL 3.0 should already be disabled, if they are not disable them immediately! The following link from Microsoft provides the registry keys and powershell needed to disable all of these services. Make sure these changes are being made on all Web Application Proxies (WAPs) and ADFS servers.

  • Disable SSL 2.0
  • Disable SSL 3.0
  • Disable TLS 1.0
  • Disable TLS 1.1
  • Disable RC4
  • Enable Strong Authentication for .NET Applications

https://docs.microsoft.com/en-us/windows-server/identity/ad-fs/operations/manage-ssl-protocols-in-ad-fs

Step 2: Reboot all Virtual Machines / Servers

This step is pretty self explanatory.

Step 3: ADFS is Br0ken, Oh Noes!!

Disabling TLS 1.0 will break ADFS 3.0, more specifically it breaks the connection between the WAPs and the ADFS servers. This is easy to fix though.

Following this article on re-establishing the trust: https://blog.rmilne.ca/2021/11/16/ad-fs-web-application-proxy-re-establish-proxy-trust/

Quick Recap: Change this registry value on the primary Web Application Proxy:

HKLM\Software\Microsoft\ADFS\ProxyConfigurationStatus –> 1

This value normally has a value of 2 (which means configured), change it back to 1, and this change does not even require a reboot.

Open up Server Manager and launch “Remote Access Manager”, select “Web Application Proxy” and put in the required information to re-establish the trust.

You may need to reboot the WAPs one more time, I had to.

Step 4: Verify SSL Services are Correct

Once all services come back up, it would be a good time to verify that all the services you think you turned off are actually off. A SSL Server Test tool would be great for that, like the one by SSL Labs: https://www.ssllabs.com/ssltest/

Step 5: You may need to correct internal .NET Applications pointing to ADFS

Internal .NET Applications may start failing. If you start to receive error messages like “Authentication failed because the remote party has closed the transport stream”, it just means you are not specifying TLS 1.2.

There is a great article on Microsoft Docs here that explains the situation and the fix: https://docs.microsoft.com/en-us/answers/questions/400152/authentication-failed-because-the-remote-party-has.html

The developers will just need to specify the SecurityProtocol in their application.

GrrCon Early Bird Tickets on Sale March 1, 2022

I attended the GrrCon Cyber Security Summit & Hacker Conference for the first time last year. Although it was kind of overwhelming I learned a lot and had a great experience. I’m planning to be back at the conference this year.

GrrCon put out a tweet last week stating that the early bird tickets would be going on sale March 1, 2022.

This year’s conference is scheduled to take place October 13th & 14th at DeVos Place in Grand Rapids, Michigan.

Re-Joining Twitch.TV In The Hopes of Further Knowledge Sharing

I have changed my username on Twitch, and I’m hoping to start being more active on the platform. While I have gathered a lot of knowledge from high school and college, most of my recent knowledge has come from colleagues and/or other prominent folks in the IT Community that give back.

I’m hoping to start using the channel once a week and plan out what the topics of discussion will be at the end of the month for the next month. If I can get going fast enough, I’m hoping to start this in February and will be posting a schedule for February soon! I’m tentatively thinking Thursday nights in the Eastern Time Zone, USA. I’m hoping to maybe try to fill at least a half-hour of content. I’ll plan to let Twitch record so if you can’t make it you can watch the recording.

Topics for discussion will range anywhere from:

  • Lessons Learned From Working in IT
  • VMware Administration
  • Active Directory Administration
    • Federated Services
    • Certificate Services
    • Group Policy
    • Security
  • Powershell Concepts & Scripting
  • Information Security Concepts
  • Palo Alto PanOS
  • Windows Server Concepts
  • Linux Server Concepts
  • The art of Googling to keep your technology job
  • Cool projects I am working on or have worked on
  • Locking down your home network

Feel free to join me over on Twitch at BlameTheFirepaul

Windows Server 2022 Core – Failed to release DHCP lease

There appears to be a bug in Server Core 2022 in regards to changing the network settings through “sconfig”.

I’m deploying a new server from template in vCenter and by default it drops onto a private network with DHCP. The first thing I will do is go edit the settings of the VM and drop it on the proper network. After the VM is properly configured I will then go through “sconfig” to reset the IP to a static IP.

In “sconfig” you punch in number “8” for “Network Settings” and select “1” for the only NIC in the machine and you will be at the following prompt:

Here you will select “1” for 1) set network adapter address.

Then select “S” for (S)tatic IP Address.

Follow the on-screen prompts to enter IP, Subnet Mask, and Default Gateway. It is here you may be prompted with the error.

Setting NIC to static IP…

Failed to release DHCP lease.

Result code: 83

Method name: ReleaseDHCPLease

If you run into this issue you can enter “15” on sconfig and drop to Powershell. You can then run the following commands:

Get-NetAdapter

This will provide the NICs and more importantly the “Name” field which will be needed below

Remove-NetIPAddress -InterfaceAlias Ethernet0 -confirm:$False

Even after getting this far you may still not be able to assign the IP through “sconfig” in which case you can do it with Powershell.

New-NetIPAddress -InterfaceAlias Ethernet0 -IPAddress 172.16.1.2 -PrefixLength 24 -DefaultGateway 172.16.1.1

You can now launch “sconfig” go back to “8” Network Settings and configure your DNS servers.

Monitoring Domain Controller Windows Firewall Logs (Part of Active Directory Hardening Series)

The first step before you can monitor the local DC firewall logs is to make sure you have properly setup your domain controllers to log firewall activity. If you have not already turned on firewall logging and increased the log size to the maximum you can configure that by looking at my prior post: https://paularquette.com/lock-down-your-active-directory-domain-controllers-internet-access-part-of-my-active-directory-hardening-series/

I have shared a new script on GitHub to do some basic monitoring of dropped traffic on your Domain Controllers. https://github.com/paularquette/Active-Directory/blob/main/AD_Monitor_DC_Firewall_Logs.ps1

I currently run this script every hour and I get plenty of overlap for logs. The logs roll relatively quick but not that quick. I’m also logging all allows and I may change that in the future to only log drops.

In order to see dropped traffic outbound you would have to have outgoing firewall rules in place. By default traffic is not blocked going out. You can reference my previous post linked above.

In the example below you can see I’m limiting all TCP/UDP outbound traffic on Non HTTP ports to a certain subset of IP ranges:

If this Domain Controller tries to send any NON-HTTP(s) traffic outside of the organization it will show up in the DC firewall logs.

Example of HTML Report:

If your IT Security group has the hardware firewalls super locked down you may not see much if any traffic being dropped on the local DCs, but it still isn’t a bad idea to have another layer of security around such a high profile service!

Changing vCenter Authentication [AD over LDAP(s)]

**EDIT** If you log into vcenter with an Active Directory account you should be able to modify an already existing Identity Source. I had been logging in with local administrator account.

For reference we already had our linked vCenter talking to Active Directory over LDAPS. However, we are currently in the process of migrating all of our VMs over to new hardware. When we tried to move the main Active Directory server providing authentication to vCenter, lets just say it was not happy.

Upon trying to enter into the Identity Sources and update the server(s) manually on the Identity Source that was already being used we received the following message: “Check the network settings and make sure you have network access to the identity source”.

It was not found until after doing some Googling that you have to remove your current running Identity Source in order to make changes. In other words delete the current identity source and add a “new” one in order to make the changes you want to make.

This just seems bad.

However, after doing a lot of testing in our TEST environment I could not seem to run into any snags. If you login with [email protected] and delete and then immediately re-add the identity source back with the same domain name, alias, etc, there does not seem to be any issues. All of your permissions on objects defined with AD groups will remain.

I used the method listed in this VMware KB for grabbing the certificates I needed for both the Primary and Secondary Active Directory Servers. (https://kb.vmware.com/s/article/2041378).

Lock down your Active Directory Domain Controllers internet access! (Part of my Active Directory Hardening Series)

If you want to follow the Security Technical Implementation Guide (STIG) for Active Directory you will come across V-53727, AD.0015, stating that internet access should be restricted. If you ask Microsoft what you should do, they also state internet access should be restricted but provide no clear mechanism to do so.

(https://docs.microsoft.com/en-us/windows-server/identity/ad-ds/plan/security-best-practices/securing-domain-controllers-against-attack#blocking-internet-access-for-domain-controllers)

What is the best way to turn off browsing the internet on Domain Controllers that doesn’t involve contacting your Information Security team? I’m glad you asked. I’m going to walk you through the process I’ve put forward to implement locked down Windows Firewall rules on the Domain Controllers.

There may be criticism here that things could be locked down even more, and I DO NOT disagree with you. This article is more about getting started on locking down your Domain Controllers not the solve-all be-all guide. This write-up is one of many I hope to include in a Domain Controller Hardening Series.

NOTE: These Firewall Rules May Not Work For Your Organization! We are not running DHCP, WINS, or Integrated AD DNS. We also have RPC dynamic ports locked to 1,000 ports.

For changing RPC ports on the Domain Controllers, I followed this article:

https://docs.microsoft.com/en-us/troubleshoot/windows-server/networking/configure-rpc-dynamic-port-allocation-with-firewalls

Create Group Policy and link it to Domain Controllers OU for Firewall Rules
(Set the scope to one DC if you are worried)

In this Group Policy, open it up and edit it and navigate to the following area:

  1. Computer Configuration
  2. Policies
  3. Windows Settings
  4. Security Settings
  5. Windows Firewall with Advanced Security

If you are implementing changes like this in a TEST environment which I highly recommend first and you happen to be connected to one of the DCs to do this work you will want to perform the following things first to prevent being disconnected.

These Domain Controllers should be behind a hardware firewall, so leaving all remote addresses set to ANY while you configure, you should still have protection from your hardware firewall until you can go through rule-by-rule and lock them down. I’m not providing any guidance here as all organizations are different.

Go to Inbound Rules and create your base ruleset.

Rule NameProtocolLocal Port
Active Directory Web ServicesTCP9389
NetBIOS Session ServiceTCP139
ICMPv4ICMPv4ANY
ICMPv6ICMPv6ANY
KerberosTCP88
KerberosUDP88
Kerberos Password ChangeTCP464
Kerberos Password ChangeUDP464
LDAPTCP389
LDAPUDP389
LDAP Global CatalogTCP3268
LDAPSTCP636
LDAPS Global CatalogTCP3269
NetBIOS Name ServiceTCP137
NetBIOS Name ServiceUDP137
NetBIOS Datagram ServiceUDP138
NTPUDP123
Remote Desktop ProtocolTCP3389
Remote Desktop ProtocolUDP3389
RPC Endpoint MapperTCP135
RPC Dynamically Assigned PortsTCP Example: 50000-51000
SMBTCP445
Windows Remote Management (WinRM)TCP5985-5986
These are created on ALL profiles

Go to Outbound Rules and create your base ruleset.

Rule NameRemote AddressProtocolLocal PortRemote Port
Allow ICMPv4, ICMPv6 OutboundAnyICMPv4/ICMPv6ANYANY
Allow All Traffic Outbound (TCP)AnyTCPANY1-79,81-442,444-65535
Allow All Traffic Outbound (UDP)AnyUDPANY1-79,81-442,444-65535
Allow Outbound Web Traffic Exceptions<IPs> Crowdstrike, PKI, etc.TCPANY80, 443
Allow Outbound Web Traffic Exceptions<IPs> Crowdstrike, PKI, etc.UDPANY80, 443
These are created on ALL profiles

By default Windows Firewall will allow all traffic outbound. These outbound rules are needed because I’m going to change the behavior to block traffic outbound by default and then put in an exception to most traffic out.

This is done to stop web traffic outbound on ports 80/443, except for the IPs we know are OK (for example Crowdstrike, or PKI services). You could and should argue that outbound traffic should be limited to your workplace but I’m not covering that level of specifics in this guide.

Right-Click “Windows Firewall with Advanced Security – LDAP://…” and click Properties.

Make sure the Firewall State is “On”, and Inbound Connections are set to “Block (default)” and Outbound Connections are set to “Block”. Verify these settings for all three Domain Profiles (Domain, Private, Public).

Next, while still in this dialog box under “Domain Profile” click Customize under Settings. I have turned off displaying a notification when a program is blocked. I have also disallowed rule merging. By turning off Rule Merging you will remove a lot of the “garbage” Microsoft Firewall Rules that are created by default. This will allow you full control of the Windows Firewall.

Next, click “Customize” under Logging, on the Domain Profile tab. Here, I’m using the default log location:
%systemroot%\system32\logfiles\firewall\pfirewall.log

I’ve also maximized the firewall log to 32MB, and I’m logging dropped packets and successful connections, this is needed for troubleshooting later.

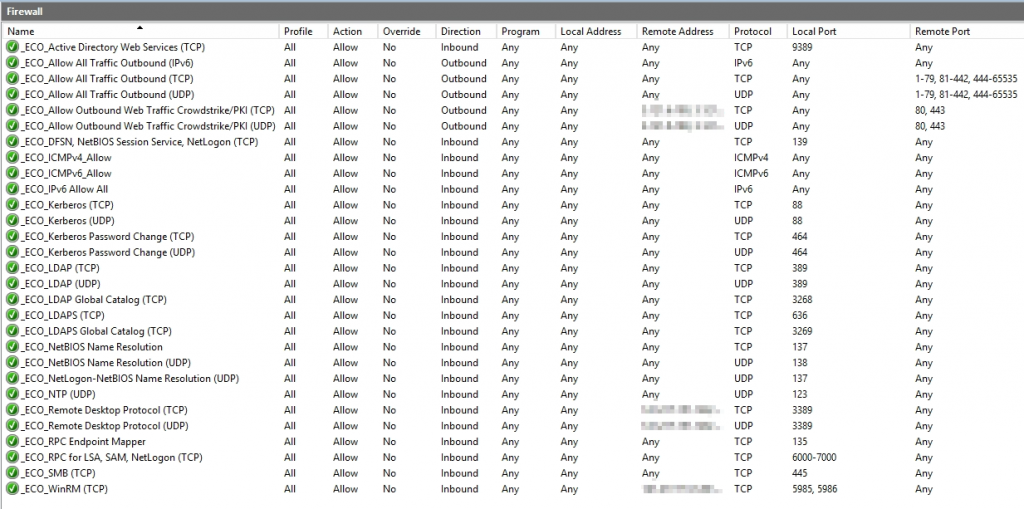
Once this is complete you should be able to to run “gpupdate /force” on one of your Domain Controllers and launch Windows Firewall. The Windows Firewall current rules that are being enforced are found under “Monitoring -> Firewall”

You should see all of the rules that you setup enforced and you can now begin to lock down things potentially even more-so than the hardware firewall depending on your IT Security team.

This should be enough to get you started on your journey. If you have a close relationship with your IT Security Team, it would also be good to reach out to them and get their rule-set for your Domain Controllers. You may find that you can help IT Security lock down the hardware firewall even more!

PrintNightmare – [0Day] Windows Critical Vulnerability

I had been watching Twitter all day yesterday and amongst all the #infosecbikini photos filling up InfoSec Twitter there was mention of this critical Windows vulnerability. At first it sounded like the June patches would protect you, then Twitter seemed to lose faith that was the case.

The US Cybersecurity & Infrastructure Security Agency (CISA) released the following notice the evening of June 30, 2021. (https://us-cert.cisa.gov/ncas/current-activity/2021/06/30/printnightmare-critical-windows-print-spooler-vulnerability)

It has been recommended to disable the Windows Print spooler service on Domain Controllers and any systems that do not print.

EDIT: As of writing this entry the best workaround I have been able to find if you need to keep print services running is here: https://blog.truesec.com/2021/06/30/fix-for-printnightmare-cve-2021-1675-exploit-to-keep-your-print-servers-running-while-a-patch-is-not-available/

EDIT 2: Microsoft has finally responded: https://msrc.microsoft.com/update-guide/vulnerability/CVE-2021-34527

EDIT 3: CISA put out emergency directive: https://cyber.dhs.gov/ed/21-04/

For your meme viewing pleasure: